
USER GUIDE
PV Phone Identity — User Guide
Turn your customers’ phone numbers into a faster, friendlier way to sign in, check out, and stay in the loop — with SMS and WhatsApp built right into WordPress and WooCommerce.
Welcome
Passwords get forgotten. Emails end up in spam. Phones, on the other hand, are always in hand — and that’s exactly what PV Phone Identity puts to work for your store. Instead of asking customers to remember a username and password, they simply enter their phone number and a one-time code sent by SMS or WhatsApp. It’s quicker for them, and it means fewer abandoned sign-ups and fewer “forgot password” support tickets for you.
The same phone number then becomes your direct line to every customer: order confirmations, shipping updates, and delivery notices can all be sent as a text message or WhatsApp message instead of an email that might never get opened.
This guide walks through every screen you’ll use to set PV Phone Identity up, and every screen your customers will see once it’s live. Every example below uses a demo store, a demo customer (“Alex Morgan”), and made-up phone numbers, so you can see exactly how each screen looks and behaves before you go live with your own store.
Contents
01
Getting Started
Installing PV Phone Identity is just like installing any other WordPress plugin. Upload it from Plugins → Add New → Upload Plugin, or drop it into your site’s plugins folder, then activate it from the Plugins screen.
Once it’s active, you’ll see PV Phone Identity listed with its own icon, and a new “Phone Identity” menu appears in your WordPress dashboard sidebar. That’s your home base for everything covered in this guide.

PV Phone Identity on your Plugins screen, ready to configure.
02
Activating Your License
Before you can configure anything, PV Phone Identity needs your license key. This confirms your purchase and turns on automatic updates, so you always have the latest features and fixes without lifting a finger.
BEFORE YOU CONTINUE
To find your license key:
- Check the confirmation email you received when you purchased PV Phone Identity.
- Or sign in to your Plugins Vault customer account and open “My Licenses”.
- Copy the license key shown there.
1. Paste your license key
Go to Phone Identity → Settings → License, and paste the key into the License Key field.
2. Click “Activate License”
Your key is verified instantly, and the status badge switches to Active.
3. You’re unlocked for good
Once activated, every setting stays available to you even if your license later lapses — for example, if a renewal is missed. Only automatic updates pause until the license is active again, so there’s never a risk of your store’s sign-in suddenly breaking.
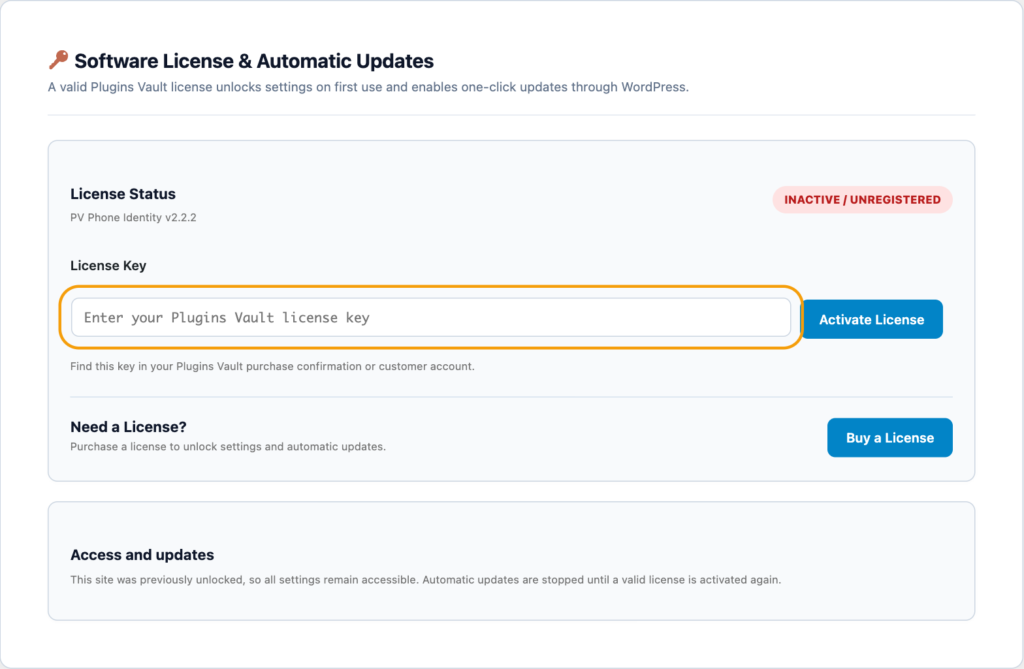
The License screen — paste your key and click Activate License to unlock every setting.
03
Choosing How Customers Sign In
The General Settings screen is where you decide exactly how phone-based sign-in behaves on your store. Every option is off by default except the two “where should this apply” checkboxes, so turning the plugin on never surprises your customers with a sudden change — you choose exactly what to switch on, and when.
1. Phone verification on registration
Turn this on and new customers must confirm their phone number with a text-message code before their account is usable — a great way to keep your customer list free of typos and fake numbers. Leave it off and customers can still register right away, with their number simply marked as unverified until they confirm it later.
2. Phone authentication surfaces
Two separate switches let you choose exactly where phone sign-in appears: your regular WordPress login/registration screens, and/or WooCommerce’s My Account login/registration screens. Turn on whichever matches how your customers actually sign in — most WooCommerce stores will want the second one on.
3. Login via OTP
Offers customers a one-time code by text or WhatsApp as an alternative to typing a password. Customers who’d rather use a saved password still can — this simply adds a faster option alongside it.
4. Password recovery link
Hides the “Forgot password?” link on your login screens. Only turn this on if you’ve gone fully passwordless — otherwise leave it visible so customers who do use a password can still recover it.
5. Order notifications
The master switch for sending order updates by SMS/WhatsApp instead of email. Turn it on here, then choose exactly which order stages to notify on under the Notifications screen (covered later in this guide).
6. Require mobile number
When turned on, landline numbers are politely rejected wherever your store’s country data can tell the difference — since a text message can’t reach a landline anyway.
7. OTP channel order
Choose the order in which a one-time code is attempted — for example, WhatsApp first, falling back to SMS, then email. If the first channel doesn’t go through, the next one is tried automatically, so a code always has a way to reach your customer.
8. Email field
Decide how (or whether) email appears at all. “Hidden” removes it completely from checkout and account screens — customers never need to think about it. “Optional” shows it as a nice-to-have: if a customer adds one, they get the bonus of an emailed one-click login link alongside their text code.
Whatever you turn on above, customers can always sign in with their username or email and a password as a fallback — so nobody ever gets locked out of their account, even on a login form built with Elementor, Bricks, Divi, or the block editor.
And if you drag a brand-new phone sign-in block or widget onto a page with any of those builders, it automatically starts out offering whichever methods you’ve already turned on here — so it matches your store from the moment you add it, no reconfiguring needed. Widgets you’ve already set up keep whatever you chose for them.
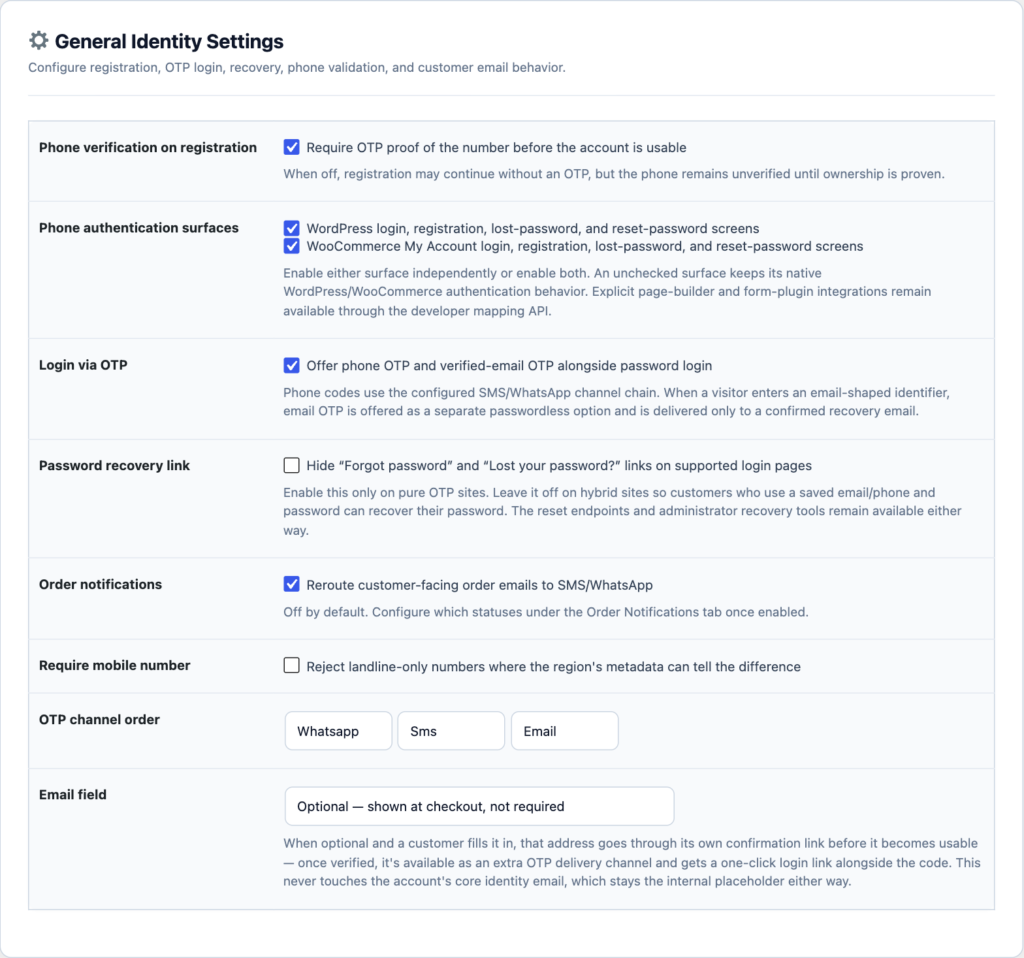
General Settings — every switch that shapes the sign-in experience, in one place.
04
Supported Countries & Number Formats
PV Phone Identity automatically formats phone numbers correctly for every country you sell to, complete with the right flag and calling code — so a customer never has to guess how to type their number.
This list is pulled straight from your WooCommerce selling settings, so there’s nothing extra to maintain here. If your store sells worldwide, customers get a searchable country dropdown; if you sell to a single country, the plugin skips the dropdown entirely and shows a fixed calling code, keeping things even simpler.
1. Default country
The country shown first when the phone field loads — set this to wherever most of your customers are.
2. Favorite countries
Pin your top markets to the top of the country dropdown, above a divider, so frequent customers don’t have to scroll to find their country.
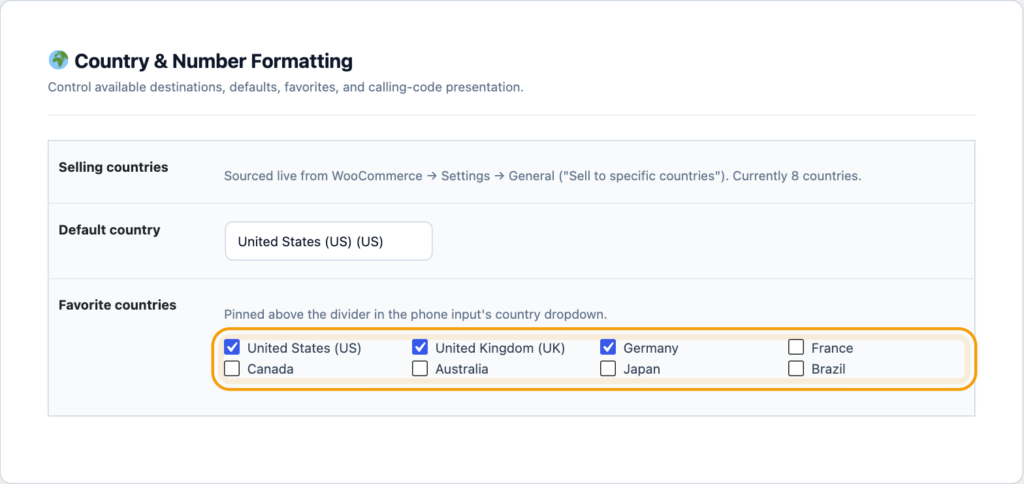
Countries & Number Formatting, with two markets pinned as favorites for quick access.
And when a customer actually taps into a phone field built with a shortcode or a page-builder widget, that country picker now opens as a proper searchable dropdown. Customers can also just start typing a country name or code to jump straight to it, instead of scrolling through the full list.
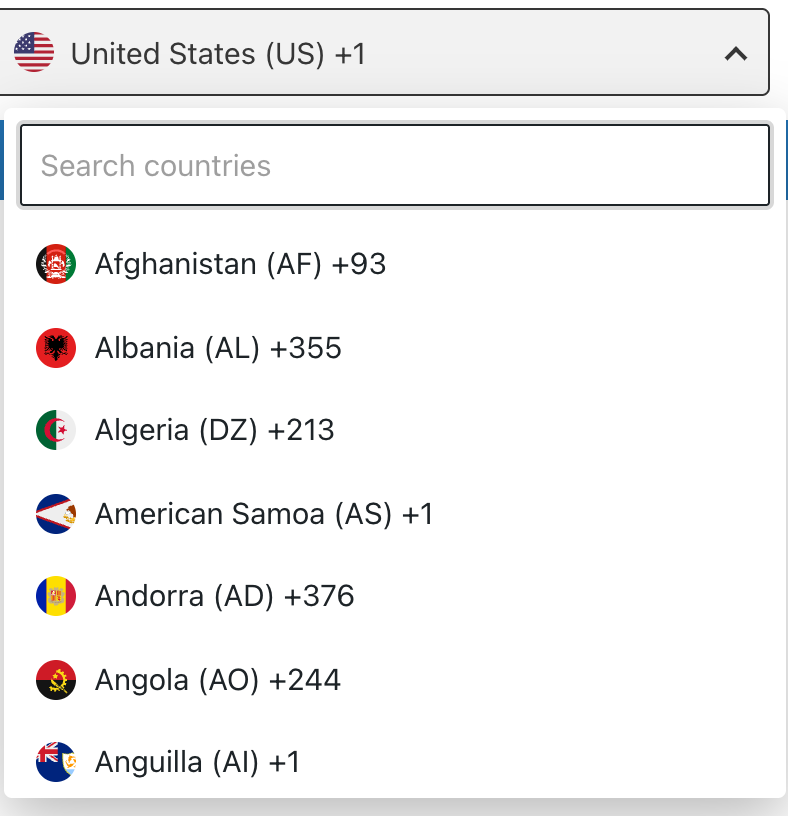
The country picker customers see — a searchable dropdown with a flag, name, and calling code for every country.
05
Connecting SMS & WhatsApp
This is where you connect the messaging providers that actually deliver your codes and order updates. You don’t need a provider connected to try everything out first: the built-in “Log only” option lets you test the complete sign-in and checkout experience with zero setup and zero cost, recording every code where you (and only you, as the store owner) can see it. When you’re ready to go live, connecting a real provider takes just a few minutes.
1. Default gateway
Choose which connected provider handles sending by default. Keep this on “Log only” while you’re testing — it never contacts a real phone, so you can try the whole flow safely before anything goes live.
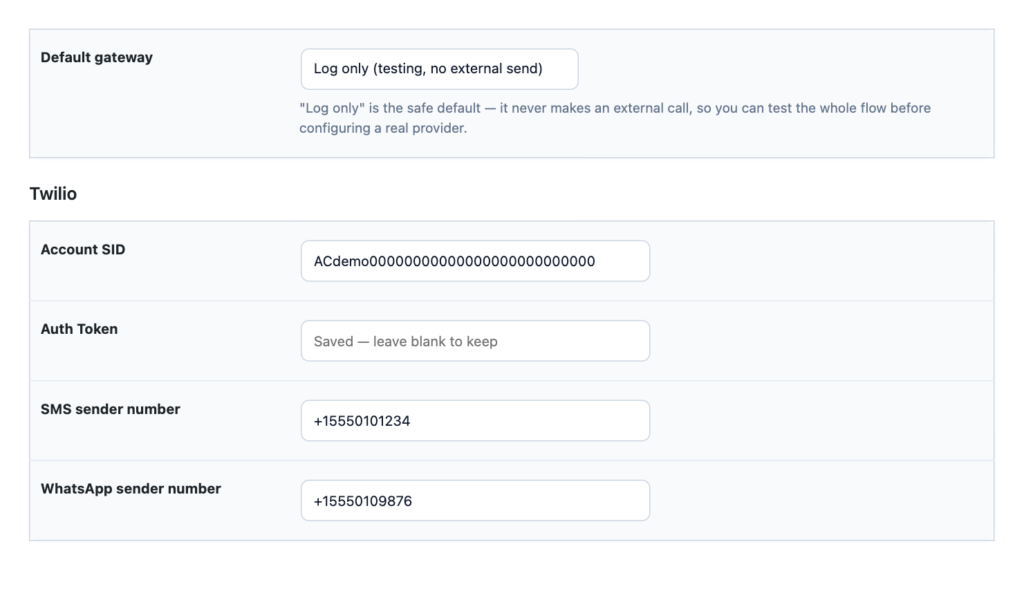
Choose your default provider and connect Twilio for SMS and WhatsApp.
Connecting Twilio
Twilio is a popular way to send both SMS and WhatsApp messages from the same account. Here’s how to get the details PV Phone Identity needs:
ON TWILIO
- Sign in to your account at console.twilio.com.
- On the Console dashboard, copy your Account SID.
- Click “Show” next to Auth Token, then copy it.
- Open Phone Numbers → Manage → Active Numbers, and copy the number you’ll send SMS from.
- If you’re also sending WhatsApp messages, copy your approved WhatsApp sender number the same way.
- Back in your WordPress dashboard, paste the Account SID, Auth Token, SMS number, and WhatsApp number into the matching fields, then save.
Connecting Meta WhatsApp Cloud API
Prefer to connect straight to Meta without a third-party service in between? The Cloud API integration talks directly to WhatsApp Business Platform.
ON META BUSINESS MANAGER
- Sign in to business.facebook.com with your business account.
- Open Business Settings → Users → System Users, and create (or select) a system user.
- Click “Add Assets”, choose your WhatsApp Business Account, and grant it full control.
- Click “Generate Token”, select your WhatsApp app, tick the messaging permission, and generate the token.
- Copy the generated access token.
- Open your WhatsApp Business Account settings and copy the Phone Number ID for your sending number.
- Back in your WordPress dashboard, paste the Phone Number ID and Access Token into the matching fields, then save.
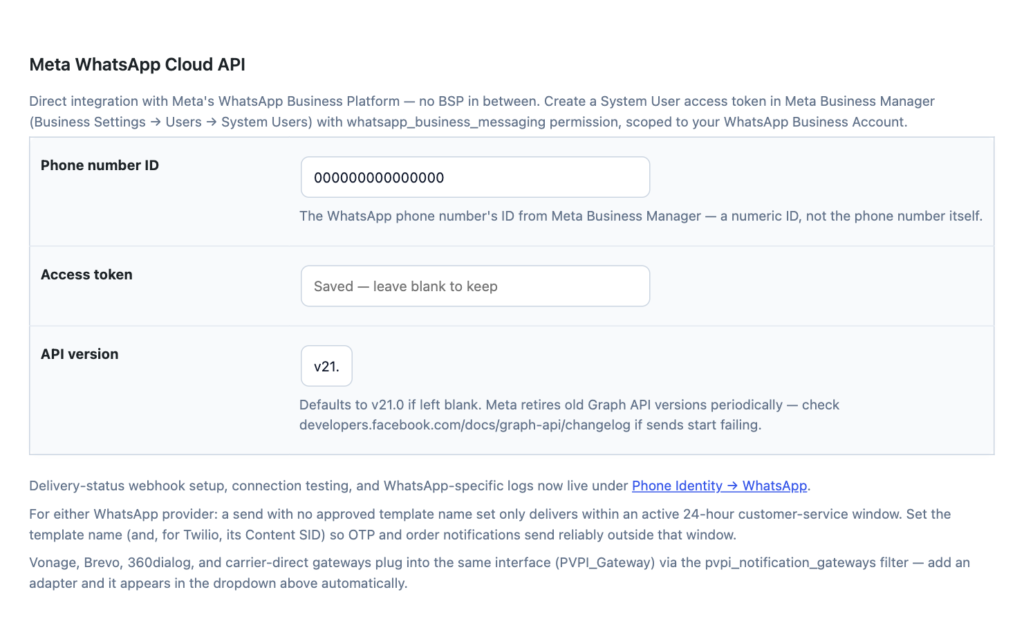
Connect Meta’s WhatsApp Cloud API directly — no middleman required.
Sending different countries through different providers
Have a preferred local provider for one market and Twilio for everywhere else? Set an override per country — anything left on “use default” simply follows your main provider choice above.

Optional per-country routing, so each market can use the provider that works best there.
06
Matching Your Brand
The phone/OTP sign-in box doesn’t have to look like a generic plugin bolted onto your site — it can look like it was designed for your store. Turn on custom styling and a live preview appears right there on the settings screen, updating instantly as you adjust colors, fonts, spacing, borders, buttons, and the success/error messages, so you can see exactly what your customers will see before saving anything.
Every visual detail is yours to control: the overall card, the labels, the input fields, the country selector, the buttons and their hover effects, the links, and the confirmation/error messages. If you ever want to start over, one click resets everything back to the polished defaults.

Turn on custom styling to make the sign-in box match your store’s look.
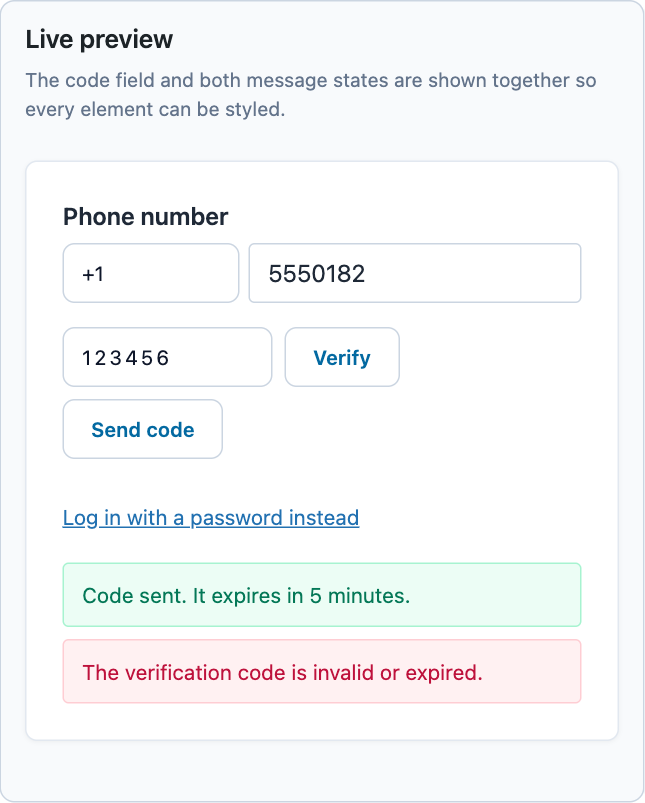
A live preview updates instantly as you design — what you see is exactly what customers get.
07
Keeping Customers Updated on Their Orders
Email order confirmations get lost. A text message gets read within minutes. Once “Order notifications” is switched on under General Settings, this screen lets you choose exactly which stages of an order send a message, and in what order to try SMS, WhatsApp, and email for each one.
Turn on whichever stages matter most to your customers — order received, payment confirmed, shipped, completed, and so on — each with its own independent delivery order. Anything left off simply continues sending its normal email as before.
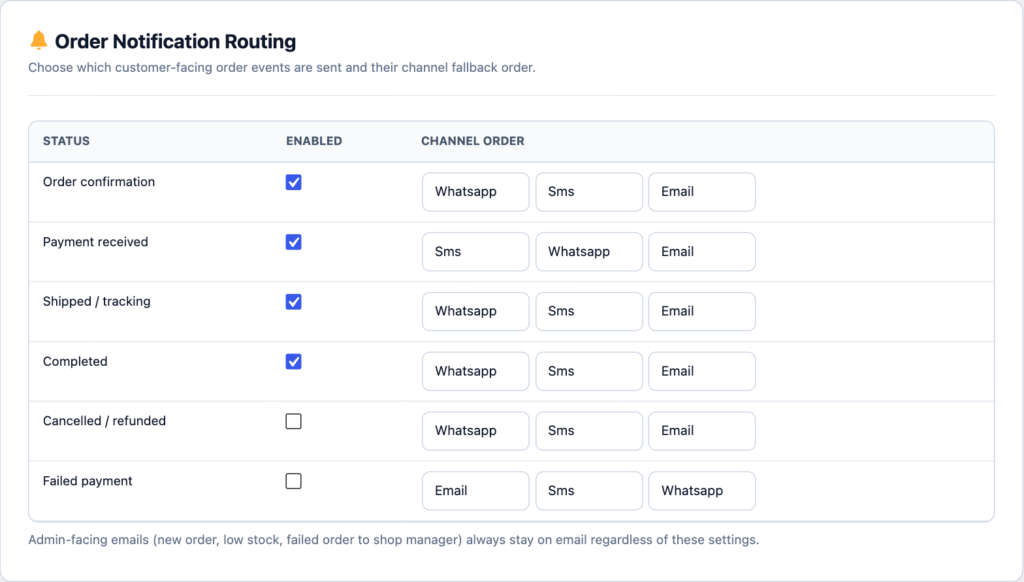
Choose which order stages text or WhatsApp your customers, and in what order to try each channel.
08
Writing Your Own Messages
Every message PV Phone Identity sends — verification codes, password resets, and every order update — is fully yours to rewrite in your own voice. Pick the message type, drop in placeholders like the customer’s name or the order number, and it’s filled in automatically every time that message goes out.
You can also write different wording for SMS versus WhatsApp, and add translations for any language your customers speak — each one falls back gracefully to your default wording if a customer’s language doesn’t have its own version yet.

The verification-code message, with placeholders you can drop in anywhere in the text.
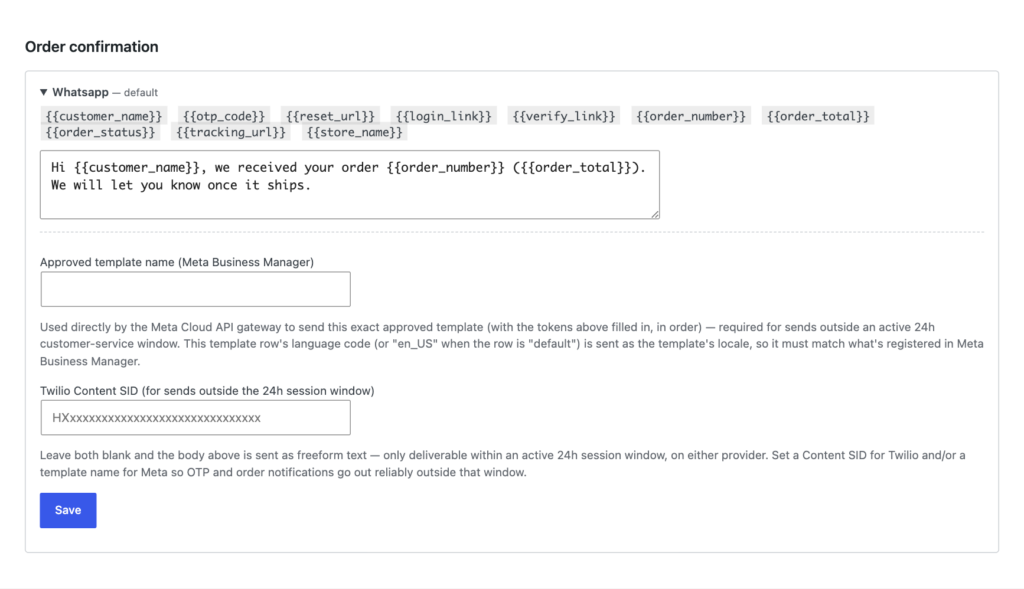
The order-confirmation message — written once, sent automatically on every order.
Getting a WhatsApp message template approved
WhatsApp requires messages sent outside an active conversation to use a pre-approved template. This only matters once you’re sending real WhatsApp messages — while testing with “Log only” you can ignore this entirely.
ON META BUSINESS MANAGER
- Sign in to business.facebook.com and open your WhatsApp Manager.
- Go to Account Tools → Message Templates, and click “Create Template”.
- Write your message using the same placeholders shown on the Message Templates screen (for example, the customer’s name or the order number).
- Submit the template for approval and wait for Meta’s confirmation (this is usually quick).
- Once approved, copy the template’s name.
- Paste that name into the matching “Approved template name” field on the Message Templates screen, then save.
09
Monitoring Activity
Want a quick look at what’s been sent recently? The Notification Log shows the last 100 messages across every channel — verification codes, password resets, and order updates — newest first, along with whether each one was successfully handed off for delivery.
While you’re testing with the “Log only” option, you’ll even see the exact wording that was sent, which makes it easy to double-check your message templates look right before connecting a real provider. Once a real provider is live, this screen shows delivery status only, keeping your customers’ message content private and secure.
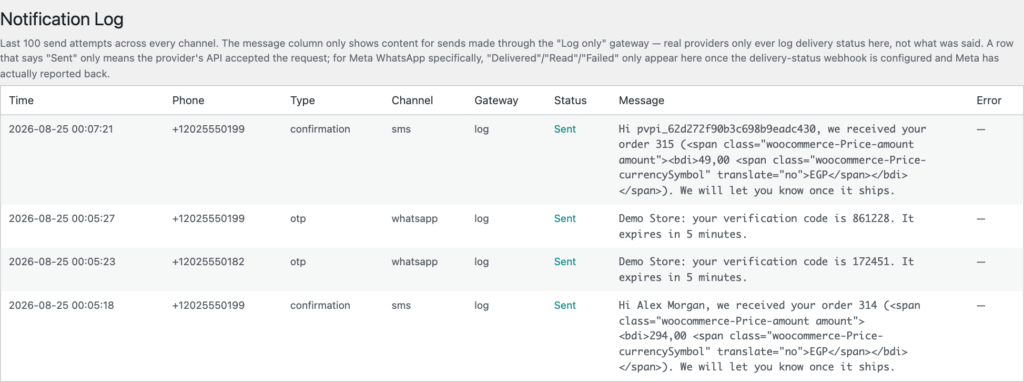
A running list of recent sends, useful for a quick health check or for testing new templates.
10
The WhatsApp Command Center
Phone Identity → WhatsApp is a dedicated space for everything WhatsApp-specific — testing your connection and, if you’re on the Meta Cloud API, setting up delivery receipts so you know when a message has actually reached your customer.
1. Send a test message
Pick a connected provider, enter any phone number, and send a real test message right from your dashboard — the fastest way to confirm everything’s wired up correctly before customers start using it.
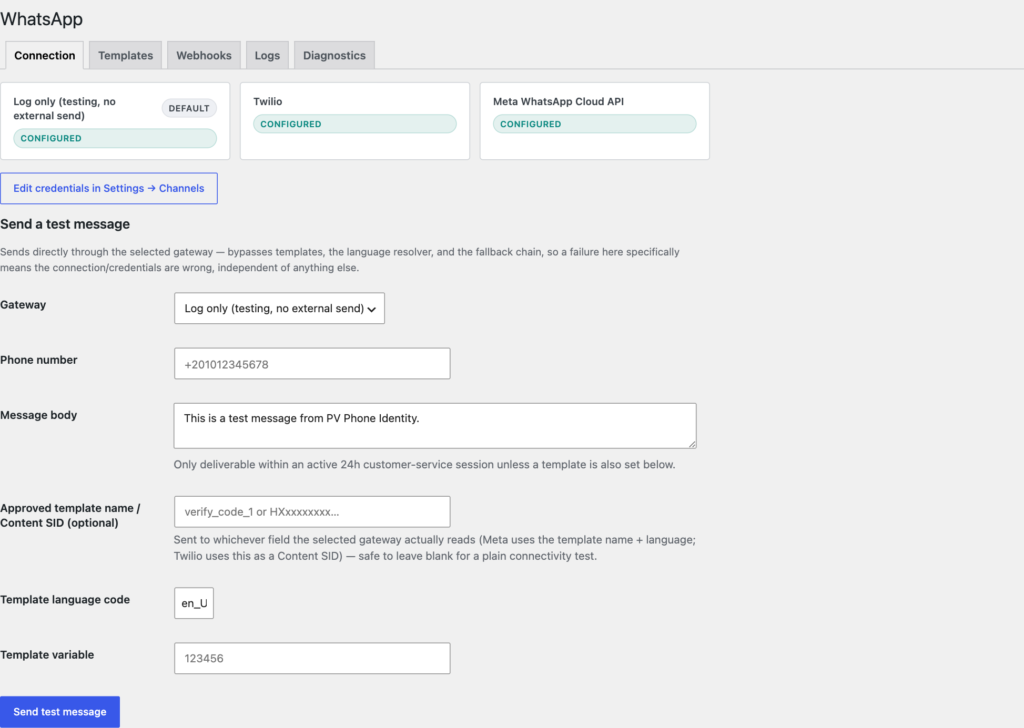
Send a live test message to confirm your connection is working.
Turning on delivery receipts (Meta Cloud API)
This optional step lets the plugin show you when a WhatsApp message has actually been delivered and read, not just sent. It only applies to the Meta Cloud API connection.
ON META APP DASHBOARD
- In Meta Business Manager, open your WhatsApp app’s settings, then go to Configuration.
- Copy the Callback URL shown on the plugin’s Webhooks screen.
- Paste that URL into the Callback URL field on Meta’s Configuration screen.
- Choose any word or phrase as a verify token, and enter it in the same Meta screen.
- Enter that same verify token into the plugin’s Verify Token field and save.
- Back in Meta, click Verify and Save to confirm the connection.
- Under Webhook Fields, subscribe to “messages”.
- In Meta App Dashboard → App Settings → Basic, copy your App Secret.
- Paste the App Secret into the plugin’s App Secret field and save.

Once connected, this screen shows whether delivery receipts are being received.
11
The Customer Journey: Signing In
Here’s what your customers actually see. Phone sign-in appears right on your existing login screen — no extra page, no extra plugin for customers to notice. It leads with the fast option: enter a phone number, get a code, and you’re in.
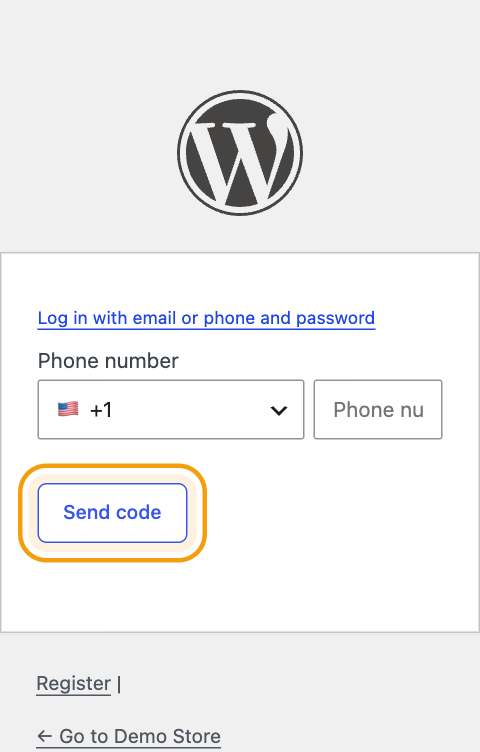
Phone-first sign-in: enter a number, request a code, and log in — no password required.
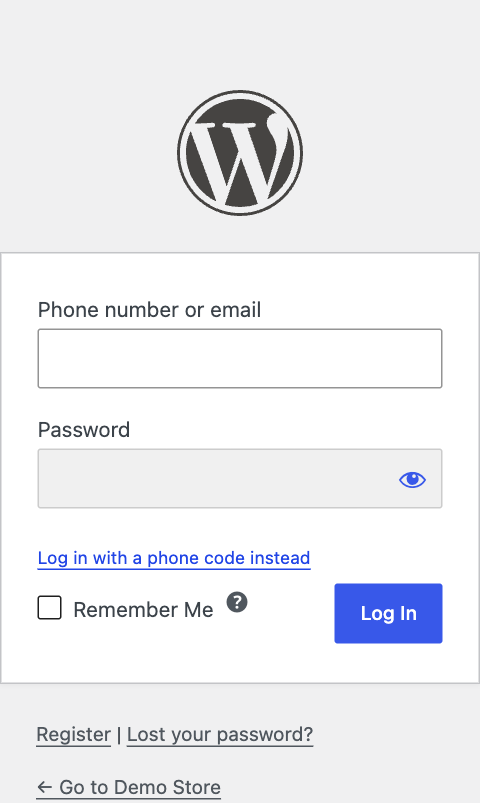
Customers who prefer a saved password can still switch to it with one click.
12
The Customer Journey: Creating an Account
Signing up is just as simple: a phone number, a password, and a text-message code to confirm it’s really them. The whole thing — registration, verification, and first login — happens in one smooth sequence, with no extra emails to confirm and no separate steps to remember.
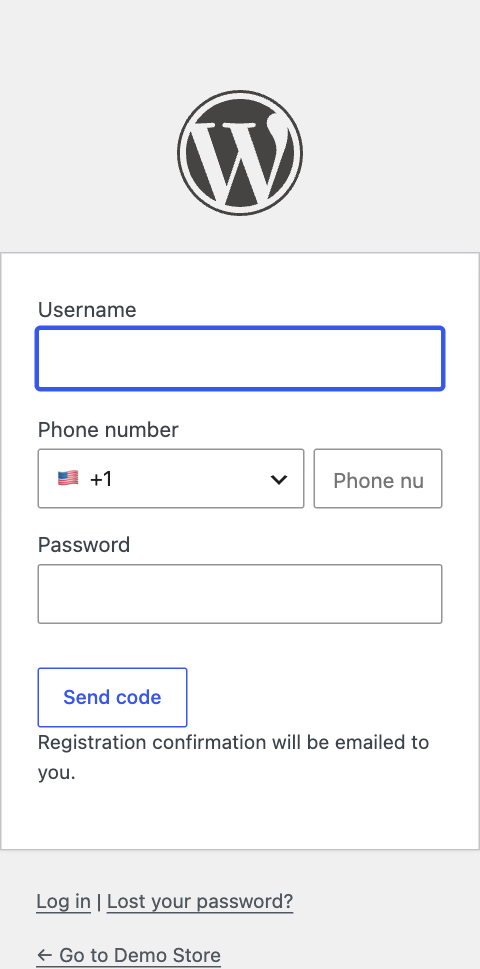
A clean, simple sign-up form.
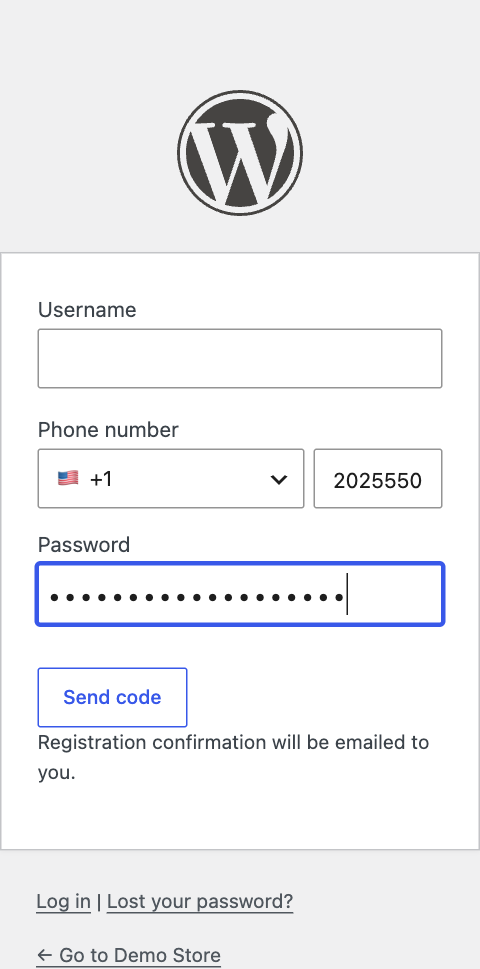
Phone number and password entered, ready to send a code.
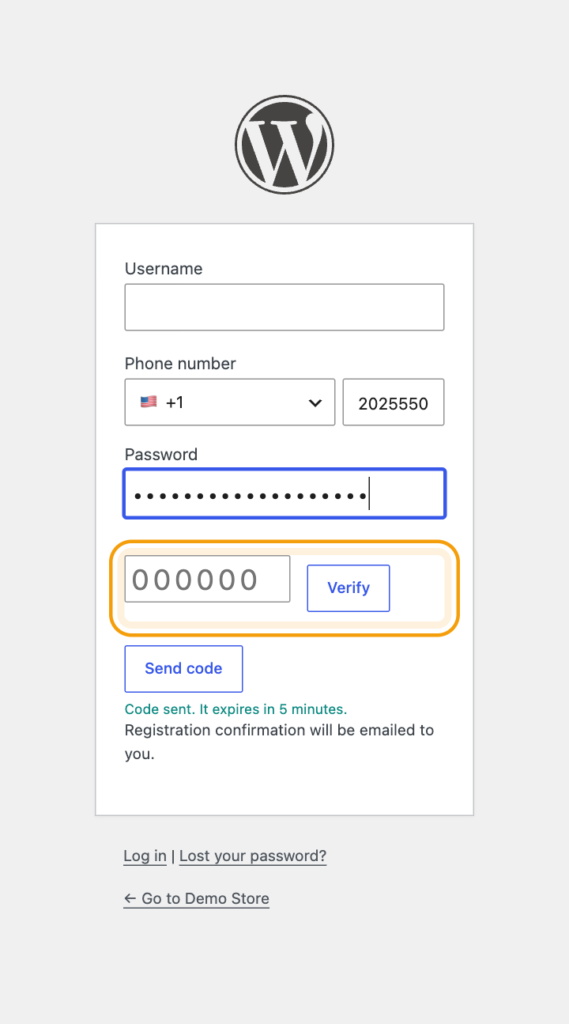
A code arrives by text or WhatsApp within seconds.
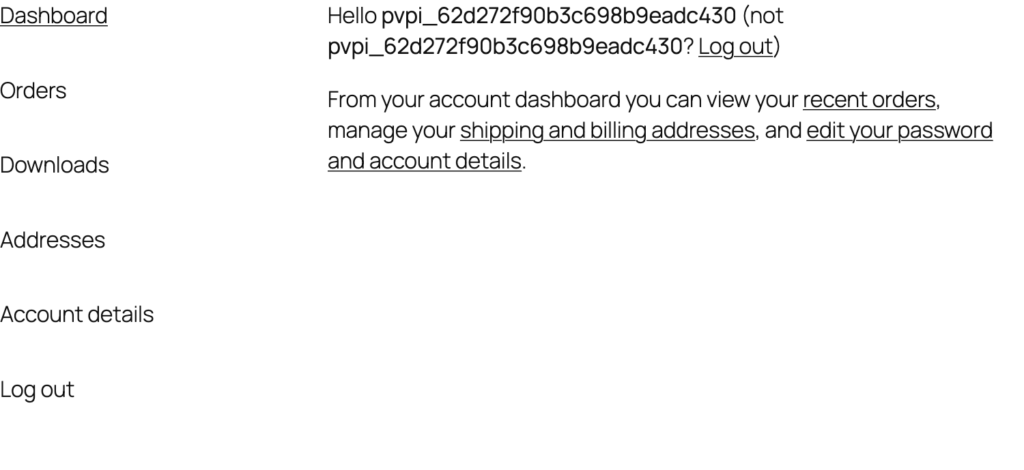
One correct code later, the new customer is registered, verified, and signed in.
13
The Customer Journey: Managing Their Details
From My Account, customers can update their phone number themselves whenever they get a new one — verified with a fresh code, just like at sign-up — and, if you’ve made email optional, add a personal email address as a backup way to receive codes and a one-click login link.
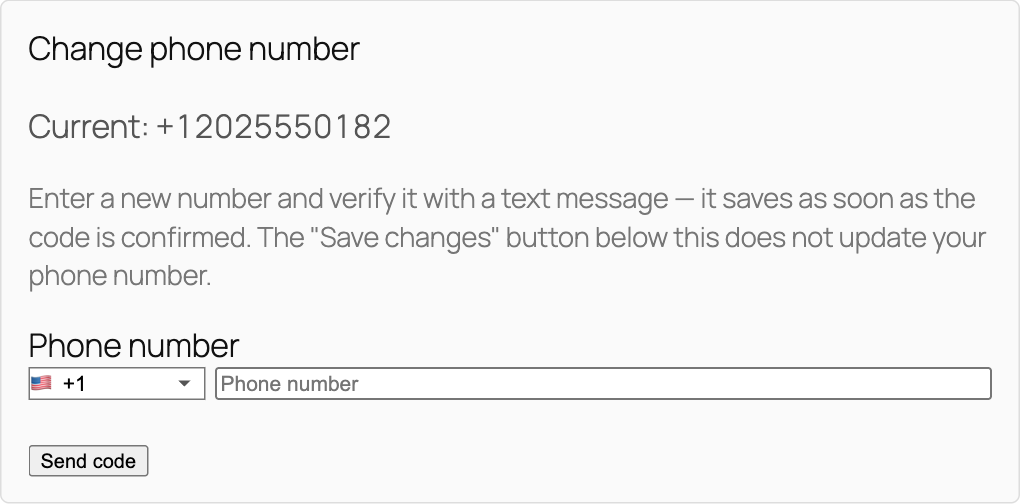
Customers can update their own phone number at any time, right from My Account.
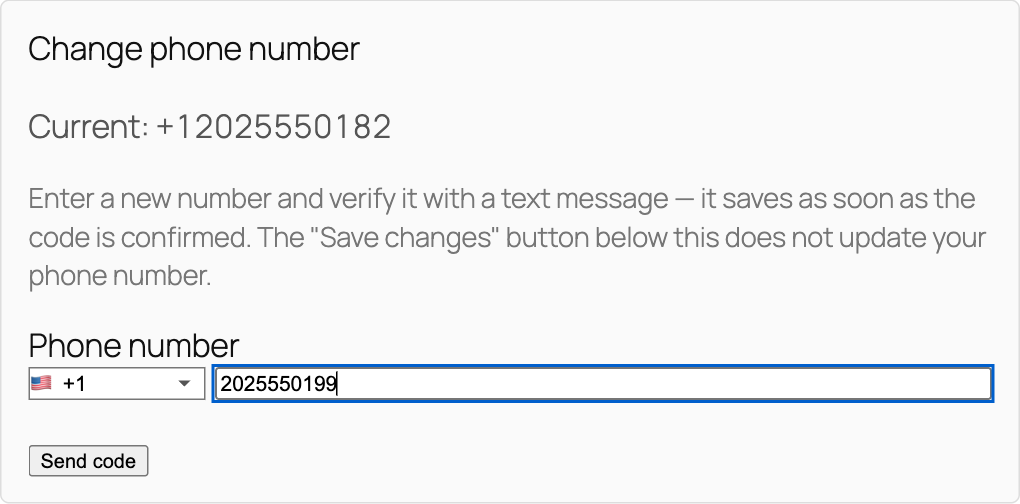
A new number entered, ready to verify.
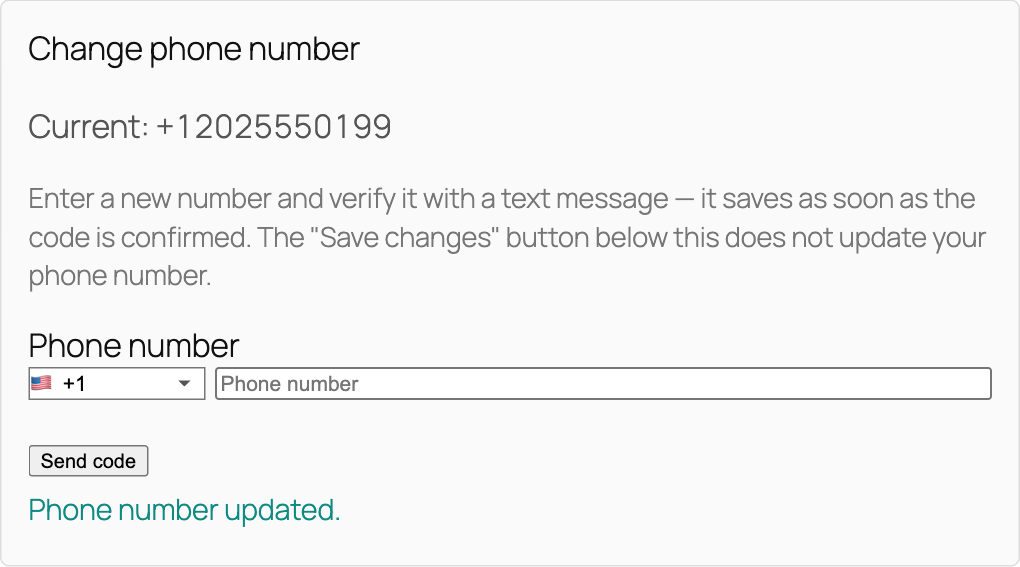
Verified and saved instantly — no page reload needed.
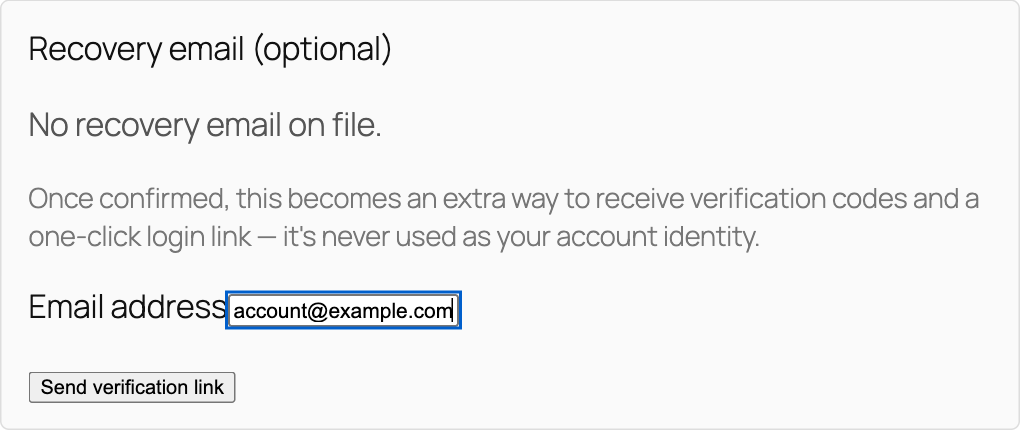
An optional backup email address, only if the customer wants one.
14
The Customer Journey: Checking Out
The phone field is always there at checkout — WooCommerce never lets a store remove it completely, since it’s how you’ll reach a customer about their order. Whether it’s marked required depends on how you’ve set things up: turn on any phone-based sign-in method in Phone Identity settings, and we’ll also require phone at checkout, since you’ll need a working number to reach that customer. You can also require it directly from WooCommerce’s own checkout settings if you’d rather do it that way, independently of your sign-in setup.
Email follows its own separate setting from section 03 — hidden entirely, or offered as a nice-to-have — and never becomes a requirement of its own just because phone is required. When order notifications are turned on, customers can also opt in to receive their updates on WhatsApp with a single checkbox.
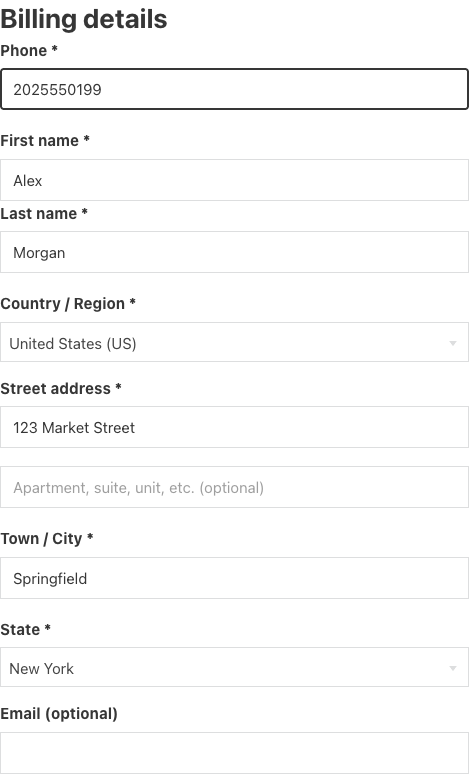
With phone sign-in turned on, checkout now asks for phone number as required.
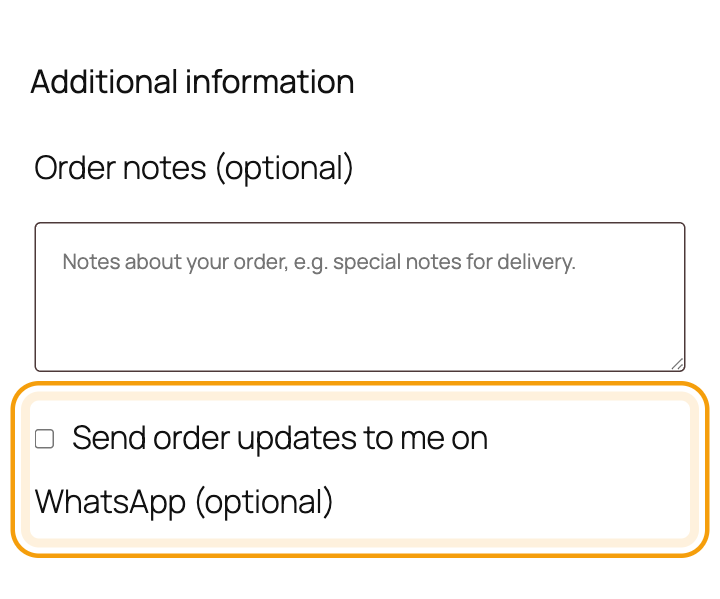
A simple opt-in checkbox lets customers choose WhatsApp for their order updates.

Order confirmed — and, behind the scenes, a confirmation message is already on its way.
15
Using Page Builders
Building your pages with a drag-and-drop builder instead of shortcodes? PV Phone Identity meets you there too. Alongside the shortcodes on the next page, it adds two ready-made elements — “Phone Identity Form” and “Phone with Country Code” — directly inside Elementor, Bricks, the WordPress block editor, and Divi, under the exact same names in every one of them.
Elementor
In Elementor, open the widgets panel and search “Phone” — both “Phone Identity Form” and “Phone with Country Code” appear in the results. Drag either one onto your page, then use the panel on the left to choose what it does.
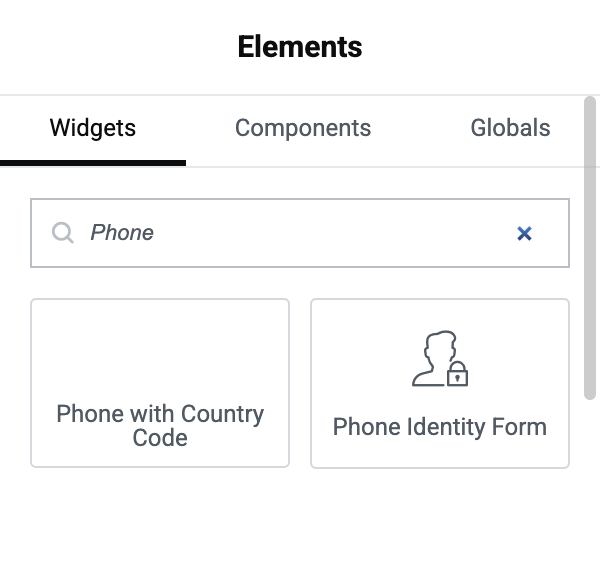
Searching “Phone” in Elementor’s widgets panel finds both elements at once.
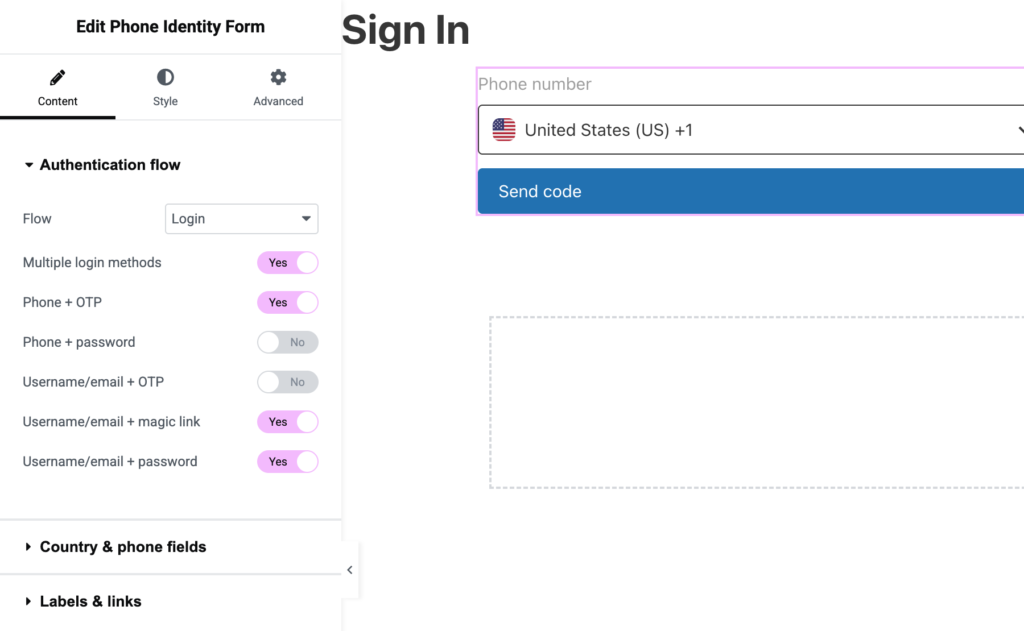
Phone Identity Form placed on the page, with its authentication flow settings open on the left.
Bricks
Bricks groups both elements into their own “PV Phone Identity” category in the elements panel — search “Phone” or scroll down to find it. Click either one to add it to your page, then open its settings to adjust the flow, country field, and labels.
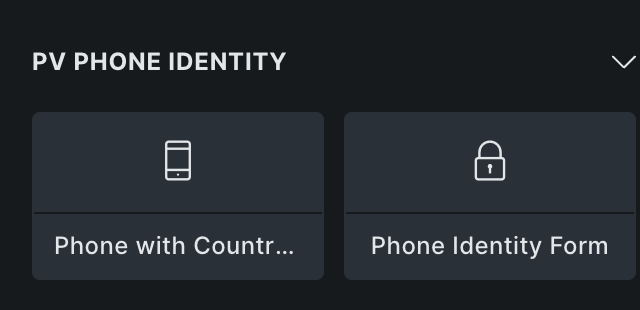
Both elements live under their own “PV Phone Identity” category in the Bricks elements panel.
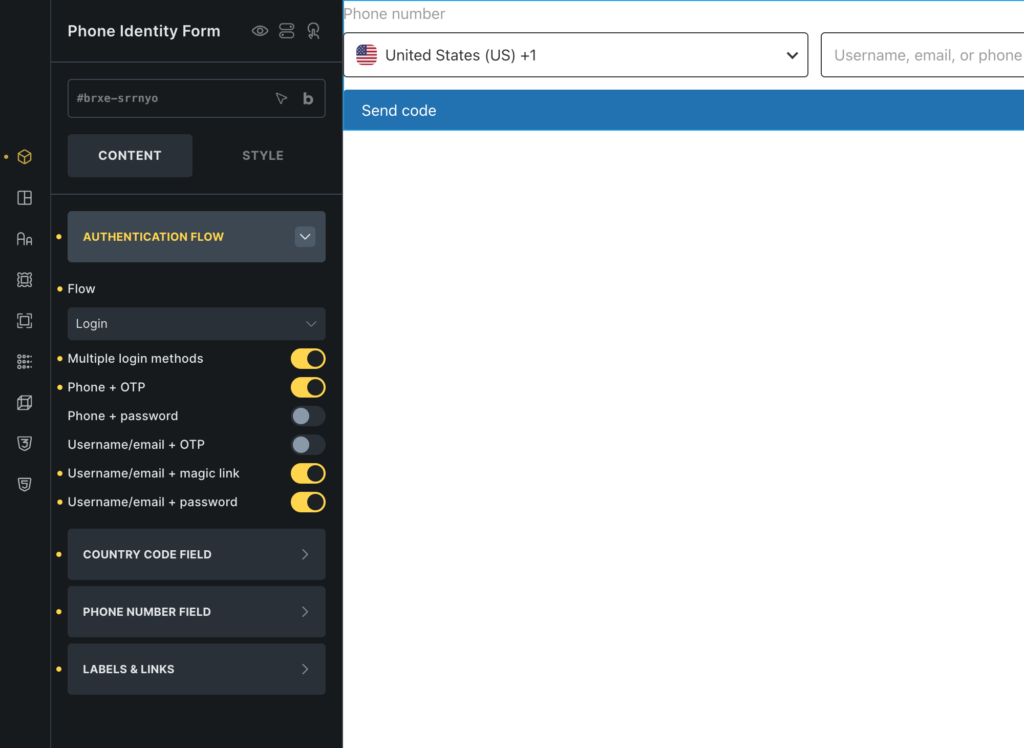
Phone Identity Form’s Authentication flow settings, right inside the Bricks builder.
Block editor (Gutenberg)
In the standard WordPress block editor, click the “+” inserter and search “Phone Identity” — both blocks appear right away, with no extra plugin required. Insert one and its settings appear in the sidebar on the right.
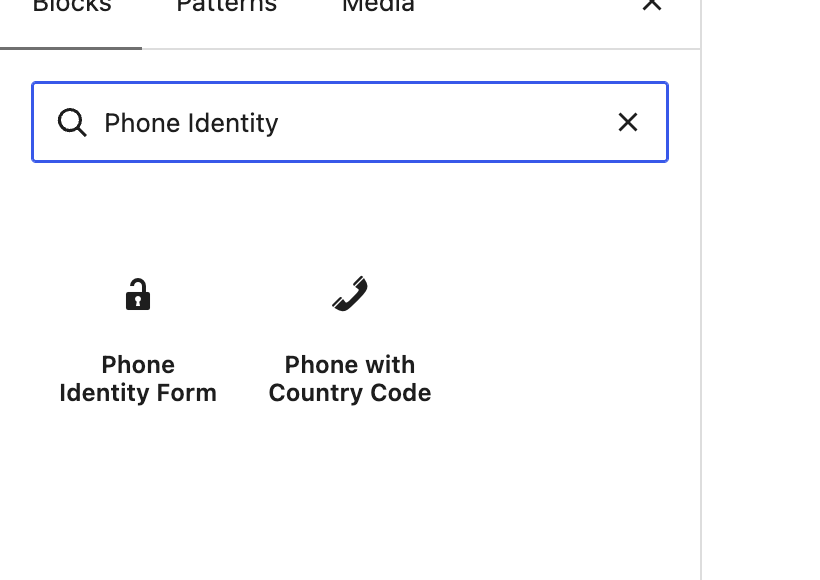
Searching “Phone Identity” in the block inserter finds both blocks straight away.
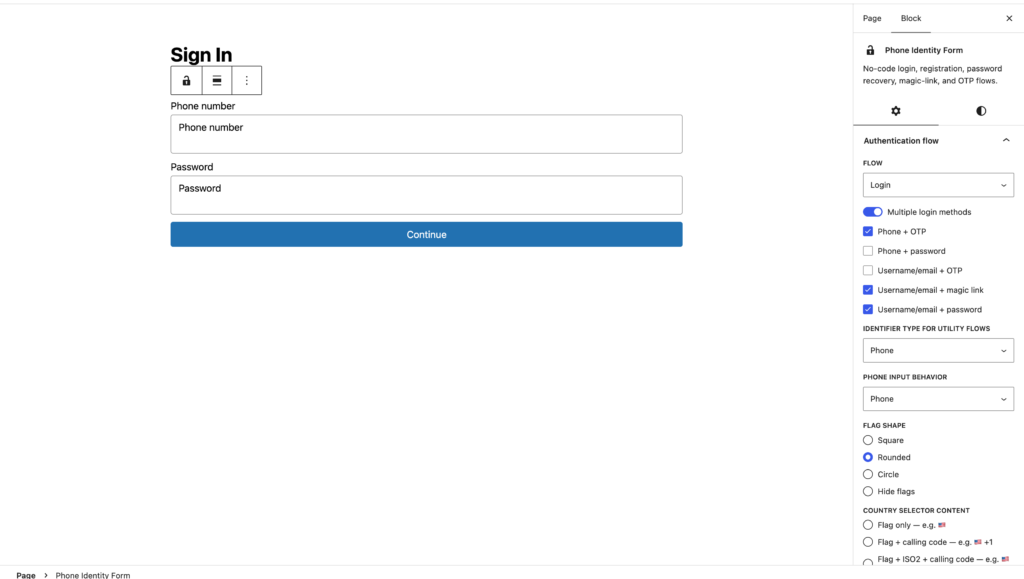
Phone Identity Form added to a page, with its Authentication flow settings open in the sidebar.
Divi
The same two modules — “Phone Identity Form” and “Phone with Country Code” — are also available in Divi’s own module library, under those exact same names. Search “Phone Identity” in Divi’s module search to find them the same way.
Not using one of these three builders? The shortcodes on the next page work anywhere, in any theme.
16
Using Shortcodes
Not using a page builder? Shortcodes let you drop a Phone Identity screen straight into any page or post by typing a short tag — no page builder needed.
[pvpi_login]
Puts a sign-in form — phone or password, following your settings — directly on any page or post.
[pvpi_register]
Puts a new-account sign-up form on any page or post.
[pvpi_account] (same as [pvpi_profile])
Lets a logged-in customer update their own phone number — and their recovery email, if that’s turned on — from any page. It’s the same self-service screen shown in section 13, just usable outside of My Account.
[pvpi_phone_field]
Adds just the phone number field, with its country dropdown, on its own — useful for building a custom form. Give it a custom label with label="...", a custom field name with name="...", or mark it required with required="yes".
[pvpi_auth_form]
A more flexible version of the sign-in form for page builders and custom pages: choose the flow with flow="login" (or "register", "forgot_password", and more) and which sign-in method it starts on with login_method="phone_otp", for example.
[pvpi_migration]
For stores that already had customer accounts before installing Phone Identity: shows existing customers a prompt to add and verify a phone number on their existing account, without changing their username. Only relevant once you’ve turned on migration for existing accounts under Phone Identity → Migration.
17
Frequently Asked Questions
Do I need to connect a real SMS or WhatsApp provider to try this out?
No. The built-in “Log only” option lets you test registration, sign-in, and checkout completely, with every code visible to you as the store owner. Connect a real provider only when you’re ready to go live.
Will this stop customers from using a password?
Not unless you want it to. Phone sign-in sits alongside your existing password login — customers can use whichever they prefer, and you can turn off the “forgot password” link only once you’ve gone fully passwordless.
What happens to the email address field?
You’re in full control. Hide it completely, or make it an optional backup that unlocks an extra way for customers to receive codes and a one-click login link. Either way, it never becomes a requirement for checking out.
Can I use one provider for SMS and a different one for WhatsApp?
Yes — connect as many providers as you like and choose which one handles each channel, with the option to route specific countries to a specific provider.
What if a customer’s number is a landline?
Turn on “Require mobile number” and landline-only numbers are politely rejected at entry, since a text message can’t reach them anyway.